Supported Models
Any hardware supporting SSE4.1 CPU and 64-Bit firmware work on this patcher. To check your hardware model, run the below command on the applicable machine in terminal:
system_profiler SPHardwareDataType | grep 'Model Identifier'
The below table will list all supported and unsupported functions of the patcher currently:
Regarding OS support, see below:
| Support Entry |
Supported OSes |
Description |
Comment |
| HostOS |
macOS 10.9 - macOS 12 |
Refers to OSes where running OpenCore-Patcher.app are supported |
Supports 10.7+ if Python 3.9 or higher (opens new window)is manually installed, simply run the OpenCore-Patcher.command located in the repo |
| TargetOS |
macOS 11 - macOS 12 |
Refers to OSes that can be patched to run with OpenCore |
May support 10.4 and newer (in a potentially broken state). No support provided. |
- macOS Monterey support is currently in beta and is not recommended for everyday users.
MacBook
| SMBIOS |
Year |
Supported |
Comment |
| MacBook1,1 |
Mid-2006 |
NO |
32-Bit CPU limitation |
| MacBook2,1 |
Late 2006 |
32-Bit Firmware limitation |
| MacBook3,1 |
Late 2007 |
| MacBook4,1 |
Early 2008 |
YES |
- No GPU Acceleration in Mavericks and newer
- No Keyboard and Trackpad
- No USB |
| MacBook5,1 |
Late 2008 |
- GPU Acceleration in Public Beta, see current issues (#108 (opens new window)) |
| MacBook5,2 |
Early 2009 |
- GPU Acceleration in Public Beta, see current issues (#108 (opens new window))
- Trackpad is recognized as mouse |
| MacBook6,1 |
Late 2009 |
- GPU Acceleration in Public Beta, see current issues (#108 (opens new window)) |
| MacBook7,1 |
Mid-2010 |
| MacBook8,1 |
Mid-2015 |
Everything is supported |
#MacBook Air
| SMBIOS |
Year |
Supported |
Comment |
| MacBookAir1,1 |
Early 2008 |
NO |
Requires SSE4.1 CPU |
| MacBookAir2,1 |
Late 2008 |
YES |
GPU Acceleration in Public Beta, see current issues (#108 (opens new window)) |
| MacBookAir3,1 |
Late 2010 |
| MacBookAir3,2 |
| MacBookAir4,1 |
Mid-2011 |
| MacBookAir4,2 |
| MacBookAir5,1 |
Mid-2012 |
Everything is supported |
| MacBookAir5,2 |
| MacBookAir6,1 |
Mid-2013, Early 2014 |
| MacBookAir6,2 |
MacBook Pro
| SMBIOS |
Year |
Supported |
Comment |
| MacBookPro1,1 |
Early 2006 |
NO |
32-Bit CPU limitation |
| MacBookPro1,2 |
| MacBookPro2,1 |
Late 2006 |
32-Bit Firmware limitation |
| MacBookPro2,2 |
Late 2006 |
| MacBookPro3,1 |
Mid-2007 |
Requires SSE4.1 CPU |
| MacBookPro4,1 |
Early 2008 |
YES |
GPU Acceleration in Public Beta, see current issues (#108 (opens new window)) |
| MacBookPro5,1 |
Late 2008 |
| MacBookPro5,2 |
Early 2009 |
| MacBookPro5,3 |
Mid-2009 |
| MacBookPro5,4 |
| MacBookPro5,5 |
| MacBookPro6,1 |
Mid-2010 |
| MacBookPro6,2 |
| MacBookPro7,1 |
| MacBookPro8,1 |
Early 2011 |
| MacBookPro8,2 |
| MacBookPro8,3 |
| MacBookPro9,1 |
Mid-2012 |
Everything is supported |
| MacBookPro9,2 |
| MacBookPro10,1 |
Mid-2012, Early 2013 |
| MacBookPro10,2 |
Late 2012, Early 2013 |
| MacBookPro11,1 |
Late 2013, Mid-2014 |
| MacBookPro11,2 |
| MacBookPro11,3 |
Mac mini
| SMBIOS |
Year |
Supported |
Comment |
| Macmini1,1 |
Early 2006 |
NO |
32-Bit CPU limitation |
| Macmini2,1 |
Mid-2007 |
32-Bit Firmware limitation |
| Macmini3,1 |
Early 2009 |
YES |
GPU Acceleration in Public Beta, see current issues (#108 (opens new window)) |
| Macmini4,1 |
Mid-2010 |
| Macmini5,1 |
Mid-2011 |
| Macmini5,2 |
| Macmini5,3 |
| Macmini6,1 |
Late 2012 |
Everything is supported |
| Macmini6,2 |
#iMac
| SMBIOS |
Year |
Supported |
Comment |
| iMac4,1 |
Early 2006 |
NO |
32-Bit CPU limitation |
| iMac4,2 |
Mid-2006 |
| iMac5,1 |
Late 2006 |
32-Bit Firmware limitation |
| iMac5,2 |
| iMac6,1 |
| iMac7,1 |
Mid-2007 |
YES |
- Requires an SSE4.1 CPU Upgrade(opens new window)
- GPU Acceleration in Public Beta, see current issues (#108 (opens new window))
- Stock Bluetooth 2.0 card non-functional |
| iMac8,1 |
Early 2008 |
- GPU Acceleration in Public Beta, see current issues (#108 (opens new window))) |
| iMac9,1 |
Early 2009 |
| iMac10,1 |
Late 2009 |
- GPU is socketed, recommend upgrading to Metal GPU(opens new window)
- GPU Acceleration in Public Beta, see current issues (#108 (opens new window)) |
| iMac11,1 |
| iMac11,2 |
Mid-2010 |
| iMac11,3 |
| iMac12,1 |
Mid-2011 |
| iMac12,2 |
| iMac13,1 |
Late 2012 |
Everything is supported |
| iMac13,2 |
| iMac13,3 |
| iMac14,1 |
Late 2013 |
| iMac14,2 |
| iMac14,3 |
| iMac14,4 |
Mid-2014 |
| iMac15,1 |
Late 2014, Mid-2015 |
Mac Pro
| SMBIOS |
Year |
Supported |
Comment |
| MacPro1,1 |
Mid-2006 |
NO |
32-Bit Firmware limitation |
| MacPro2,1 |
Mid-2007 |
| MacPro3,1 |
Early 2008 |
YES |
- Potential boot issues with built-in USB 1.1 ports (recommend using a USB 2.0 hub or dedicated USB PCIe controller)
- Potential boot issues with stock Bluetooth card, recommend removing to avoid kernel panics |
| MacPro4,1 |
Early 2009 |
Everything is supported as long as GPU is Metal capable |
| MacPro5,1 |
Mid-2010, Mid-2012 |
#Xserve
| SMBIOS |
Year |
Supported |
Comment |
| Xserve1,1 |
Mid-2006 |
NO |
32-Bit Firmware limitation |
| Xserve2,1 |
Early 2008 |
YES |
Everything is supported as long as GPU is Metal capable |
| Xserve3,1 |
Early 2009 |
Download and build macOS Installers
This doc is centered around downloading and writing the macOS installer to a USB. If you're already familiar with how to do this, you can skip.
- Note: 16GB+ USB will be required for the installer
Creating the installer
With OpenCore Legacy Patcher, our new GUI includes a download menu for macOS installers. So to start off, you'll want to grab our app:
For this guide, we'll be using the standard OpenCore-Patcher (GUI).
Once downloaded, open the app and you should be greeted with this menu:

First we'll want to select the "Create macOS Installer" button. This will present you with 2 options:

For this example, we'll assume you'll need an installer. Selecting this option will download Apple's Installer Catalogs and build a list for you to choose:
| Downloading |
Listed Installers |
 |
 |
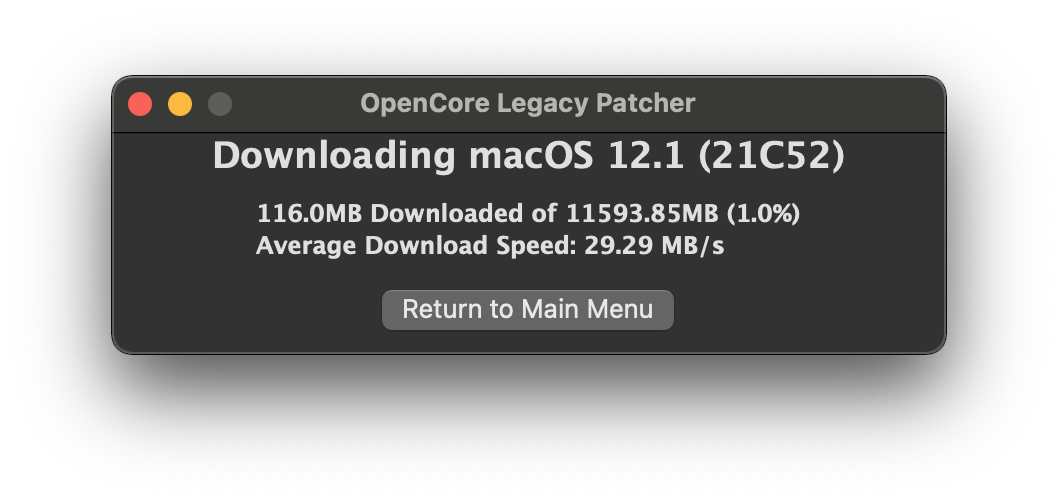
Since the patcher officially supports Big Sur and newer for patching, only those entires will be showen. For ourselves, we'll select 12.1 as that's the latest public release at the time of writing. This will download and install the macOS installer to your applications folder.
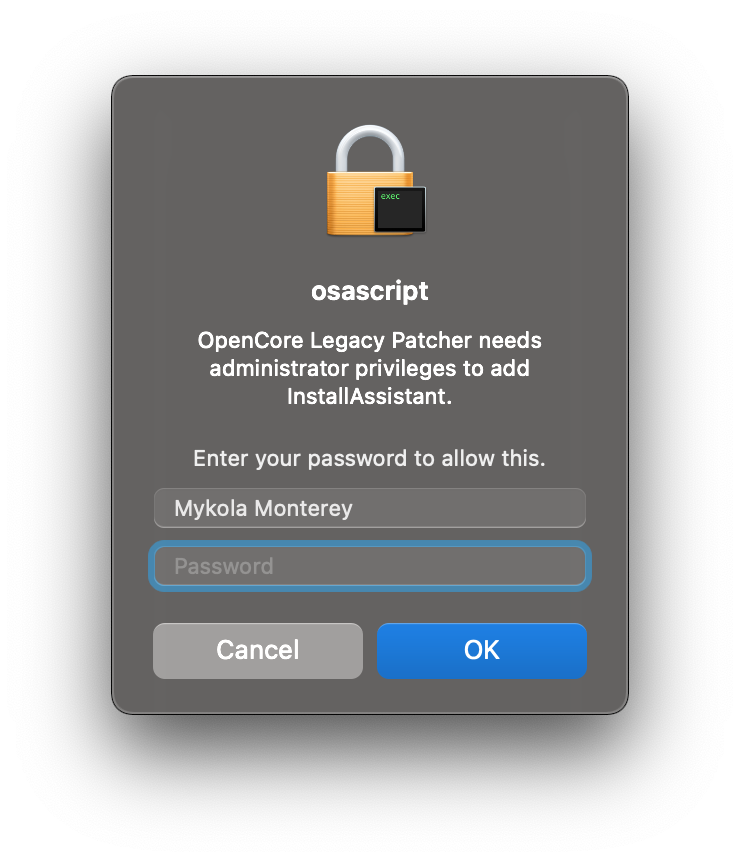
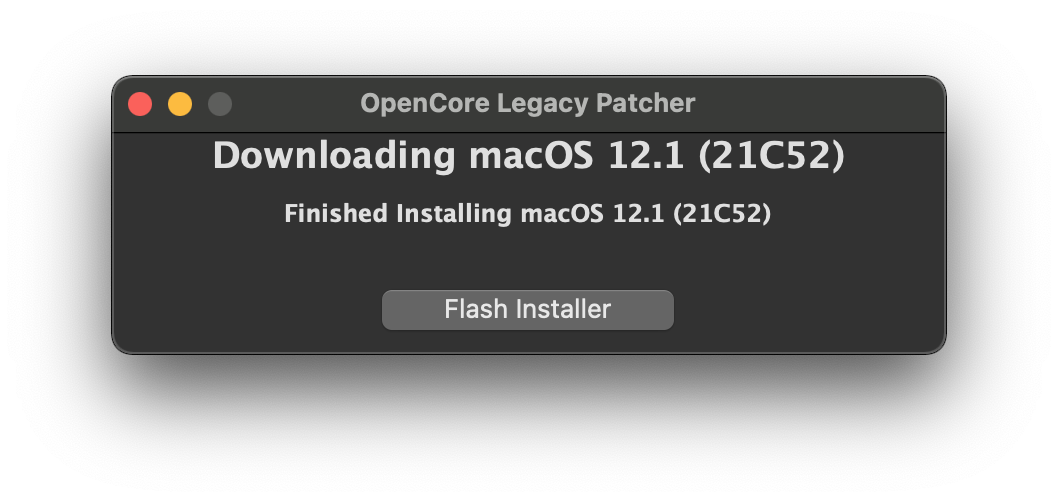
| Downloading the Installer |
Requesting to install |
Finished Installing |
 |
 |
 |
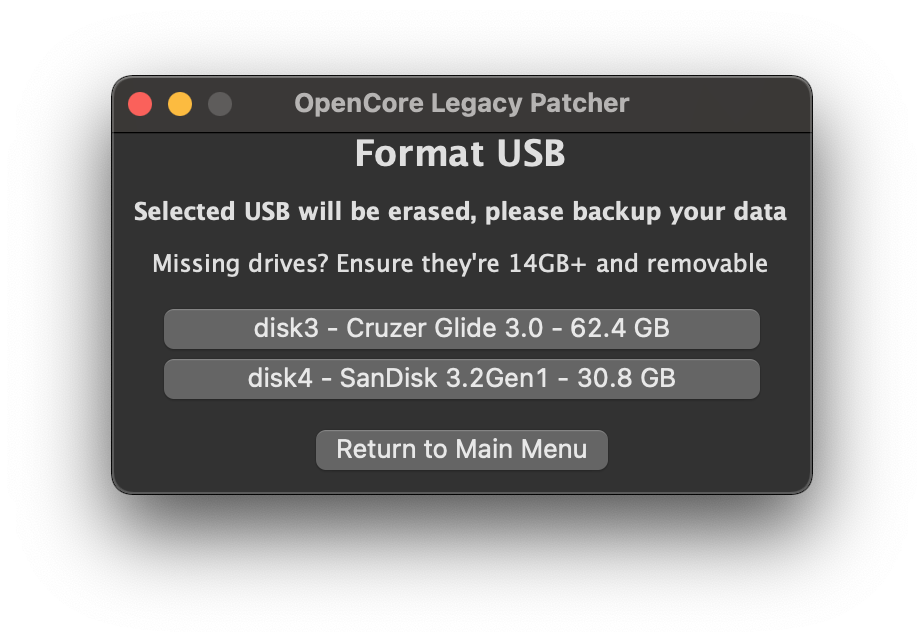
Once finished, you can proceed to write the installer onto a USB drive.
- Note: The entire USB drive will be formatted
| Select Downloaded Installer |
Select disk to format |
 |
 |
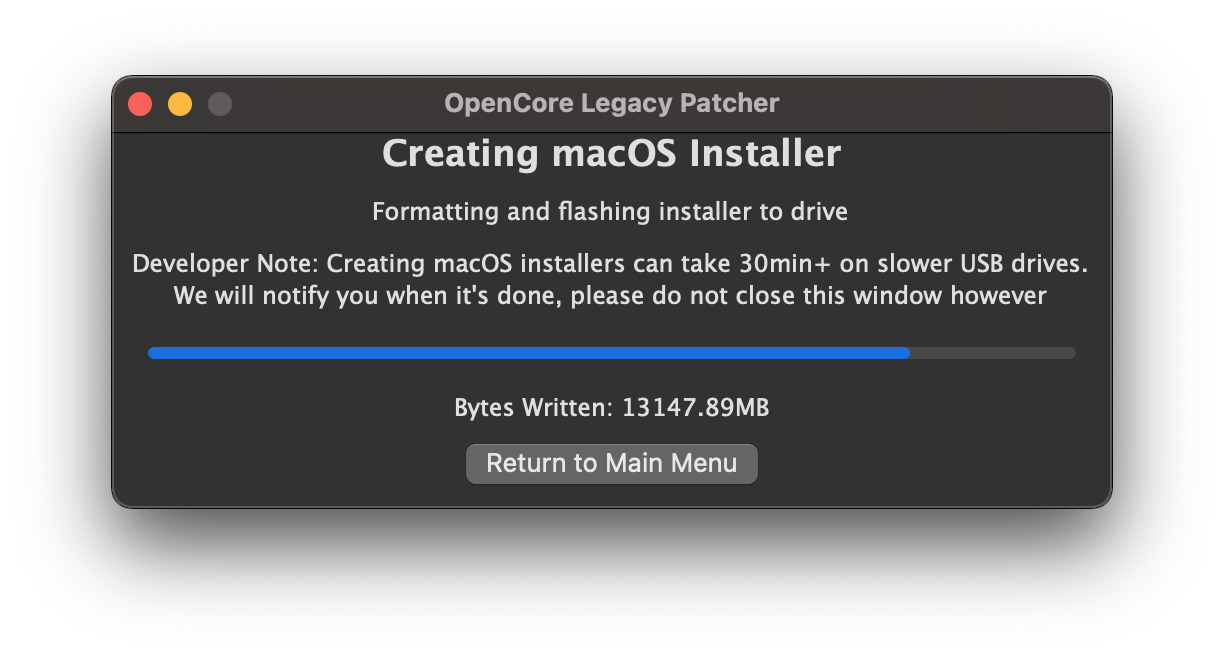
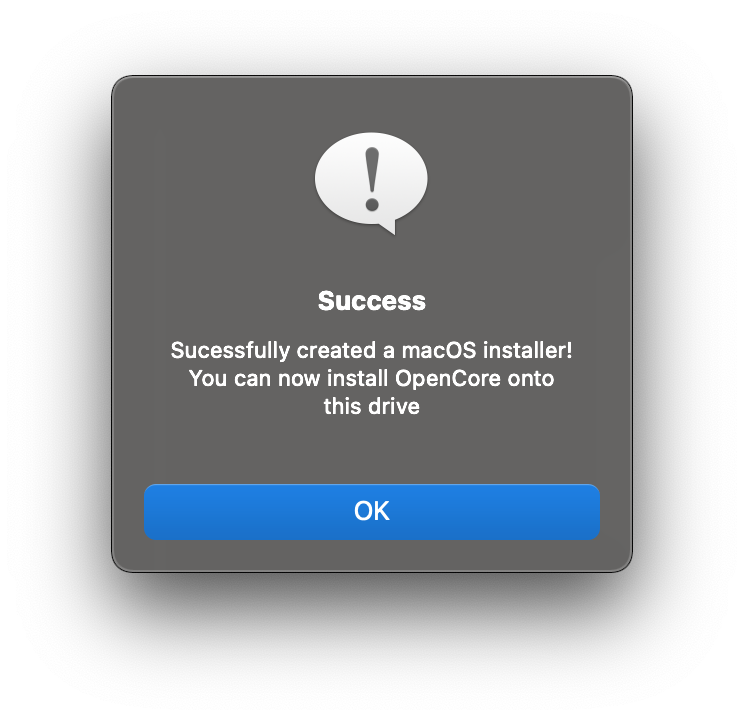
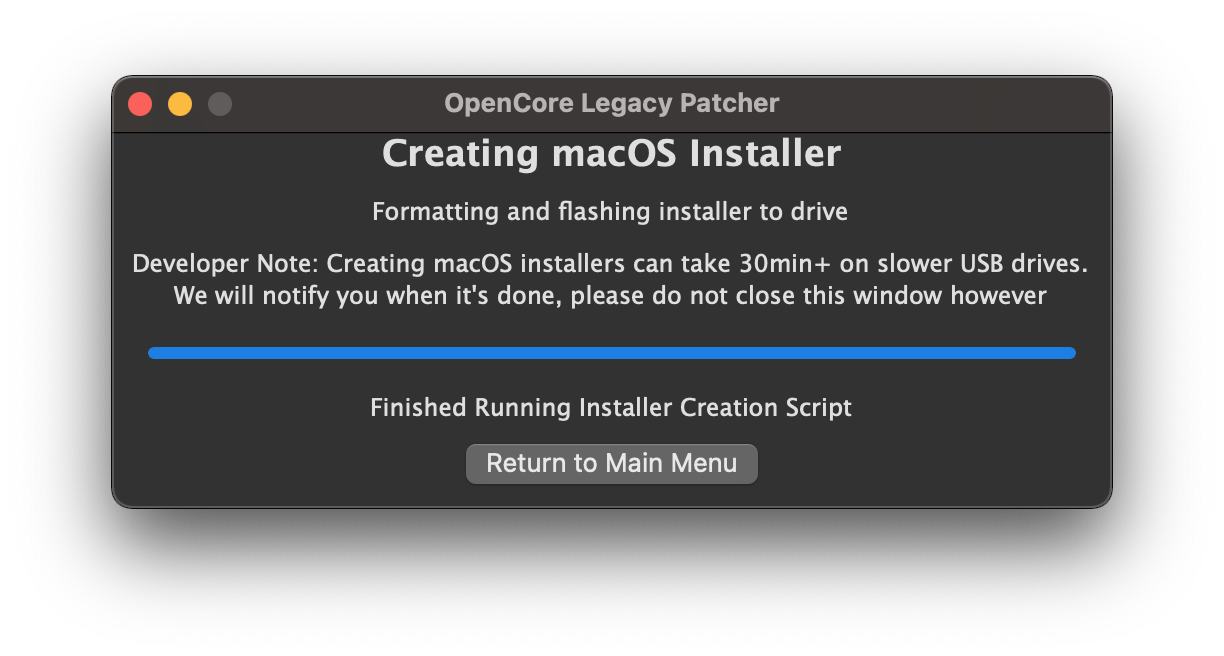
Now the patcher will start the installer flashing!
| Flashing |
Success Prompt |
Finished Flashing |
 |
 |
 |
Building and installing OpenCore
Now that we have a macOS installer, lets now build our OpenCore configuration!
If you haven't downloaded OpenCore Patcher yet, do so now:
Next, run the OpenCore-Patcher.app:
Here we'll select Build and Install OpenCore and start building:
| Start Building |
Finished Building |
 |
 |
Once it finishes building, you'll want to select the Install OpenCore button:
- If you created a macOS USB manually and don't see it listed, make sure it's either formatted as GUID/GPT or has a FAT32 partition for OpenCore to sit on
| Select Drive |
Select Partition |
 |
 |
Now we finally get to boot OpenCore!
Reboot machine while holding Option to select the EFI Boot entry with the OpenCore icon (holding the Control key will make this the default boot entry):
- This will be the Mac Boot Picker

Now that you've loaded OpenCore, now select Install macOS!:
- This will be the OpenCore Picker

After plenty of verbose booting, you will reach the installer screen! From there it's just like any normal macOS install. For an example of how the boot process looks, see the following video:
MacBookPro11,3 Note: When booting macOS Monterey, you'll need to boot into safe mode if acceleration patches are not installed yet. Otherwise you'll hit a black screen due to missing Nvidia drivers.(opens new window)
- Safe Mode can be started by holding Shift+Enter when selecting macOS Monterey in OCLP's Boot Menu.
Post-Installation
Booting without USB drive
Once you've installed macOS through OpenCore, you can boot up and go through the regular install process. To boot without the USB drive plugged in is quite simple:
- Download OpenCore Legacy Patcher
- Change Patcher settings as you'd like
- Build OpenCore again
- Install OpenCore to internal drive
- Reboot holding Option, and select the internal EFI
And voila! No more USB drive required
Booting seamlessly without Verbose or OpenCore Picker
To do this, run the OpenCore Patcher and head to Patcher Settings:
| GUI Settings |
TUI Settings |
 |
 |
Here you can change different patcher settings, however the main interest is:
Once you've toggled them both off, build your OpenCore EFI once again and install to your desired drive. Now to show the OpenCore selector, you can simply hold down the "ESC" key while clicking on EFI boot, then you can release the "ESC" key when you see the cursor arrow at the top left.
Enabling SIP
For many users, SIP will be enabled by default on build. For Intel HD 4000 users, you may have noticed that SIP is partially disabled. This is to ensure full compatibility with macOS Monterey and allow seamless booting between it and older OSes. However for users who do not plan to boot Monterey, you can re-enable under Patcher Settings.
Note: Machines with non-Metal GPUs cannot enable SIP in Big Sur either due to patched root volume
| SIP Enabled |
SIP Lowered (Root Patching) |
SIP Disabled |
 |
 |
 |
WARNING
If you're unsure whether you should enable SIP, leave as-is. Systems where you have already ran the Post Install Root Patching cannot enable SIP without potentially breaking the current install.
Applying Post Install Volume Patches
For users with unsupported GPUs/wifi cards, you'll need to run the Post Install Root Volume patches to regain functionality. See below on whether your hardware needs root volume patching.
- Hint: Try running the root volume patch option, the Patcher will determine and install patches only when required. So there is no harm in applying them
| Listing Patches |
Patching Finished |
 |
 |
WARNING
Root Patching requires a network connection by default to grab associated resources. If your system is having difficulties with wifi or ethernet, grab the Offline variants of the patcher on Github next to the regular apps: