What is API ?
API resources present a way to easily transform our models into JSON responses. In simple words, to provide one platform functionalities to another plateform we use API.
How to Integrate Third Party API in Laravel ?
Using Guzzle Http Client we can send a request from server to third party servers in Laravel.
We will create a demo on how we are creating our own local third party server. By creating two packages, one for sending request and the second one is after receiving the request, respond to that request.
Steps to use Guzzle Http Client
1. Firstly, we need to install two new Laravel Projects. One is for sending the request and second is for responding to that request :
1. Open the terminal and navigate to your project directory then use the below command for Install Project 1(laravelguzzle) to sending request.
composer create-project --prefer-dist laravel/laravel laravelguzzle
(It will take few minutes)
2. Navigate to Project 1 directory using the below command.
cd laravelguzzle
3. Start development server using the below command.
php artisan serve
Output :

Open this URL in browser for Project 1.
4. After successfully installation the Project 1, now we'll install the Project 2(laravelguzzlepost). Again navigate to your project directory and use the below command.
composer create-project --prefer-dist laravel/laravel laravelguzzlepost
5. Go into that folder(Project 2).
cd laravelguzzlepost
6. We have already started the Laravel development server at the port 8000. So now we have to start server at different port in another terminal using the following command.
php artisan serve --port=8001
Output :

Open that URL in browser for Project 2.
2. Now Install guzzlehttp/guzzle Package in Project 1 :
composer require guzzlehttp/guzzle:~6.0
e.g. :

3. Create Controller for Project 1 :
php artisan make:controller DataController –resource
Output :

We have created one controller called DataController.php, now set routes in routes/web.php file.
Route::get('post','DataController@postRequest');
Route::get('get','DataController@getRequest');
The postRequest() & getRequest() methods in controller DataController which we will define in next step.
4. Setup Database for Project 2 :
Open .env and configure the database.
DB_CONNECTION=mysql
DB_HOST=127.0.0.1
DB_PORT=3306
DB_DATABASE=laravelguzzledemo
DB_USERNAME=root
DB_PASSWORD=
5. Make a model and migration file for post table in Project 2 :
Open the terminal, navigate to Project 2 directory use the following command.
php artisan make:model GuzzlePost -m
Output :

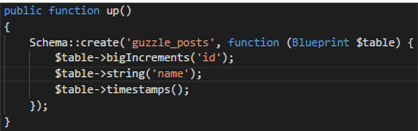
It will create two file one is model file named GuzzlePost and the second is migration file named like this "2019_06_24_041913_create_guzzle_posts_table", this file is found in database/migrations/, open the file and add below line in up() method to existing schema.
$table->string('name');
e.g. :
then use the migration Command :
php artisan migrate
6. Add routes for api's in Project 2 :
Add routes in routes/api.php for methods which is in controller GuzzlePostController in Project 2.
Route::post('store', 'GuzzlePostController@store');
Route::get('index', 'GuzzlePostController@index');
7. Guzzle http client POST request :
We have to send post request from Project 1 to Project 2, in DataController.php create a method postRequest().
public function postRequest()
{
        $client = new Client();
        $response = $client->request('POST', 'http://localhost:8001/api/store', [
            'form_params' => ]
                'name' => 'Parth',
                [
        ]);
        $response = $response->getBody()->getContents();
        echo '<pre>';
        print_r($response);
}
Now we have to store data in Project 2, in controller GuzzlePostController's method store() put the code given below.
public function store(Request $request)
{
        $data = new GuzzlePost();
        $data->name=$request->get('name');
        $data->save();
        return response()->json('Successfully added');
}
Now Run Project 1 and call route “post” :
http://127.0.0.1:8000/post

In Database :

8. Guzzle http client GET request :
Now, we have to send GET request from Project 1 to Project 2. In DataController.php file create a function getRequest().
public function getRequest()
{
        $client = new \GuzzleHttp\Client();
        $request = $client->get('http://localhost:8001/api/index');
        $response = $request->getBody()->getContents();
        echo '<pre>';
        print_r($response);
        exit;
}
Now have to retrieve data in GuzzlePostController.php file’s index() method.
public function index()
{
        $data = GuzzlePost::all();
        return response()->json($data);
}
Run Project 1 and call route “get” :
http://127.0.0.1:8000/get

Here we can see that we are getting response from the api. By using the Guzzle Http Client we can send request and getting the response efficiently.
Summary :
We have performed locally that how we can integrate third party api using Guzzle Http Client.
References :