Introduction
Blade is the simple and powerful templating engine provided with Laravel.
These blade files are nothing but views of the Laravel Framework.
Blade view files use the “.blade.php” file extension and are typically stored in the resources/views directory.
After successful installation of Laravel project, there is a predefined view structure which is already provided by Laravel itself.
We can extend that structure as per our requirement.
Steps to create a Layout/Theme
1. Here four views are created.
i.e. : about, contact, home, projects.

The views stored in resources/views/pages/, the layouts/app.blade.php has the master layout, we can modify this layout as per our requirement.
2. As an example open one of the child view blade file, here I am taking about.blade.php file as an example.
@extends('layouts.app')

@section('content')
<center><h3> Home Page </h3></center>
@stop
Here I extending the layout which is in layout/app.blade.php and writing the content of about.blade.php under section “content” which is yielded(declared) in app.blade.php.
3. Now in routes/web.php file we have to define our routes for all child view templates. All Laravel routes has to be define here.
<?php

Route::get('/', function () {
    return view('pages.home');
})->name('pages.home');

Route::get('about', function()
{
    return View::make('pages.about');
})->name('pages.about');

Route::get('projects', function()
{
    return View::make('pages.projects');
})->name('pages.projects');

Route::get('contact', function()
{
    return View::make('pages.contact');
})->name('pages.contact');
4. Now open the app.blade.php and then under the comment “Right Side Of Navbar” set our menu links.
<!-- Right Side Of Navbar -->
<ul class="navbar-nav ml-auto">
    <li class="nav-item">
        <a class="nav-link" href="{{ route('pages.home') }}">Home</a>
    </li>
    <li class="nav-item">
        <a class="nav-link" href="{{ route('pages.about') }}">About</a>
    </li>
    <li class="nav-item">
        <a class="nav-link" href="{{ route('pages.projects') }}">Projects</a>
    </li>
    <li class="nav-item">
        <a class="nav-link" href="{{ route('pages.contact') }}">Contact</a>
     </li>
</ul>
The route() function is used to call route which is defined in routes/web.php file in name() function as per the below example.
e.g. : routes/web.php
Route::get('about', function(){
          return View::make('pages.about');
})->name('pages.about');
After adding nagvigation links in app.blade.php, we are able to see the menus to the right side.
Output :
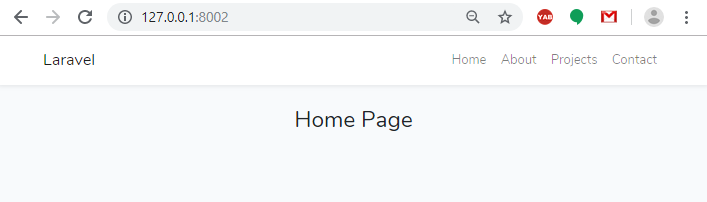
Here we have created a simple layout/theme in Laravel ,we can extend that layout as per our requirement.
5. Laravel provides built in app.css and app.js files. These files located in public/css and public/js directory respectively.
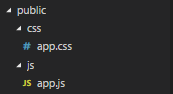
These files linked in resources/views/layouts/app.blade.php file, which contains a basic html structure.
The .css and .js file linked under <head> section .
[ Optional ] : We can also create or add our custom .js and .css as per our requirement and link to our project.
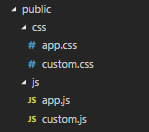
After creating the custom.css and custom.js file we have to link those to app.blade.php file under the comment of Scripts and Styles.
<!-- Scripts -->
    <script src="{{ asset('js/app.js') }}" defer></script>
    <script src="{{ asset('js/custom.js') }}" defer> </script>
<!-- Styles -->
    <link href="{{ asset('css/app.css') }}" rel="stylesheet">
    <link href="{{ asset('css/custom.css') }}" rel="stylesheet">
Here asset() function provides path upto /public directory.
References :
https://laravel.com/docs/5.8/blade
https://scotch.io/tutorials/simple-laravel-layouts-using-blade
https://www.cloudways.com/blog/create-laravel-blade-layout/