Introduction
1. Packages are used to increase functionality of Laravel Project.
2. These packages may have routes, controllers, views, and configuration specifically intended to enhance a Laravel application.
Here’s the steps for creating a package.
1. Create a folder for our new package named “packages” in the root directory.
Note : We are going to use this packages folder instead of the vendor folder because files inside of our vendor folder should only be managed by composer. Once we have published our package, if we want we can then include it in our vendor folder using composer.
2. The next step is to create a "developer" folder(as per your vendor name) inside "packages" folder.
3. Then inside of that folder we'll create another folder with the name of our package "registrationform", And Lastly we will add one last folder called /src which is where the code for our package will stored.
The structure :

4. Now inside your command prompt navigate to the folder with your package name. In our case it is : packages/developer/registrationform, and run the following command :
composer init
It will initialize the current folder as a composer package and will ask you series of questions to setup your package. Give appropriate answer to those questions and it will generate a composer.json file for our package.
e.g. :
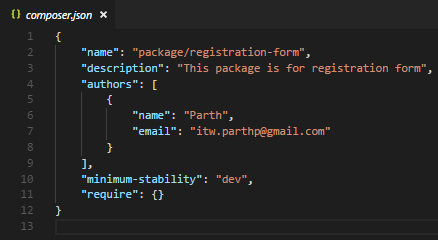
Note : If did not know about those question, Don’t worry you can press enter let It go, You can edit this later.
5. Next is load our package from our application’s composer.json. Every Laravel application has its main composer.json file in root of every new app. This is where we define all our app dependencies. Autoload our newly created package via the PSR-4 autoload block(root directory’s composer.json).

6. Then we need composer to run the autoloader and autoload our package. To do this we need to run the following command. It’s an important step otherwise it will throw errors.
composer dump-autoload
7. Now add the Service Provider of our package.
The service provider is the main entry inside of our package. This is where our packages is loaded or booted. In the root of our project create a service provider for our package using artisan command via terminal :
php artisan make:provider RegistrationformServiceProvider
This will create a new file located at : app/Providers/RegistrationformServiceProvider
After creating service provider move that to our package folder.

** Don’t Forget to change your namespace to be your Vendor\Package_Name.
In this ServiceProvider there is two method boot() and register().
boot() : the boot() method is used to boot any routes, event listeners, or any other functionality you want to add to your package.
register() : the register() method is used to bind any classes or functionality into the app.
8. Now add created service provider in our config/app.php file inside of the providers[] array:

9. After registering the Service Provider now we have to create routes.php file inside our package /src directory and add the following code:
<?php
Route::get('registrationform', function(){
    echo 'Hello from the Registrationform package!';
});
Then let's include our routes.php file inside the boot() method of our Service Provider.
public function boot()
{
    include __DIR__.'/routes.php';
}
10. Now go to the terminal and run this below command at the root of the project :
composer dump-autoload
e.g. :

It regenerates the list of all classes that need to be included in the project which is necessary after every new classes to be recognized by the application.
11. Now run the project using artisan command :
php artisan serve
e.g. :

12. Then visit our route ‘/registrationform’ in browser as per below url :
http://127.0.0.1:8000/registrationform
e.g. :

By following these simple step we are able to use our own package route.
13. Now create view and controller for better understanding.
Create controller using this artisan command(in terminal from root of the project) :
php artisan make:controller RegistrationController
Then let's move this controller from app/Http/Controllers/ to packages/developer/registrationform/src/controller/
**Note : Change your namespace in your controller above to Vendor\Package_name
Create /views folder in package’s src/ folder and create a blade template file named registration.blade.php in views folder, put a simple html for creating registration form.
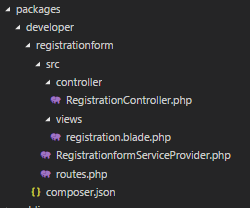
Here's the whole structure of the package.
14. Now in register() method of service provider for our package, we have to register our controller and view.
public function register()
{
 $this->app->make('Developer\Registrationform\RegistrationController');
 $this->loadViewsFrom(__DIR__.'/views', 'registrationForm');
}
$this->app->make() : This method is used to register controllers.
$this->loadViewFrom() : This method is used to register package views with laravel, you need to tell Laravel where the views are located.
This method accepts two argument : First is the path of your view templates & second is your package name or whatever you want.
Package views are referenced using the package::view syntax. So once your view path is registered in a service provider, you can load the view from our package.
15. In Controller I have created a method called index() to return my view.
<?php

namespace Developer\Registrationform;

use Illuminate\Http\Request;
use App\Http\Requests;
use App\Http\Controllers\Controller;

class RegistrationController extends Controller
{
    public function index()
    {
            return view("registrationForm::registration");
    }
}
Then set a route in routes.php file:
Route::get('registration','Developer\Registrationform\RegistrationController@index');
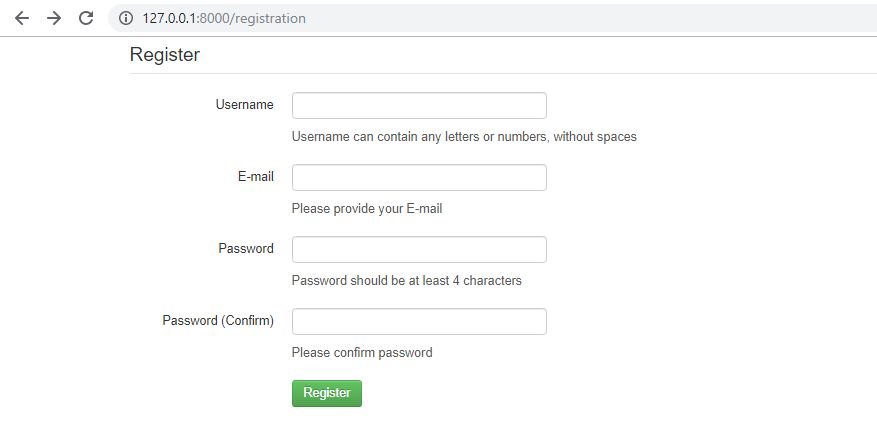
Now go to browser and check our route registration :
e.g. :
http://127.0.0.1:8000/registration
By following these steps we can create our own package and use it accordingly.
References :
https://wisdmlabs.com/blog/create-package-laravel/
https://devdojo.com/tutorials/how-to-create-a-laravel-package
https://laravel.com/docs/5.8/packages