Creating a Module :
To create a module we will have to create few files. So the Files that will be required to create a module are as follows :
1. A few registration files to let magento know that a new Module is being created.
2. One interface file to define a contract for the post.
3. A Post Model to show the post throughout our code, by implementing the post data interface.
4. A Post ResourceModel to connect the post model to the database.
5. A Post Collection to get all the posts at once from the database with the help of ResourceModel.
6. Two migration classes to setup our table and content for the posts.
7. Two Action/Controller files : to show the list and individual posts.
8. Two view and layout files for each individual and list view.
Note : All new Modules should be created in the "app/code" folder of your magento installation folder. If the "code" folder is not present, we can create one and create our module inside that folder.
Every module naming is done in the following format, i.e. "Namespace_Module"
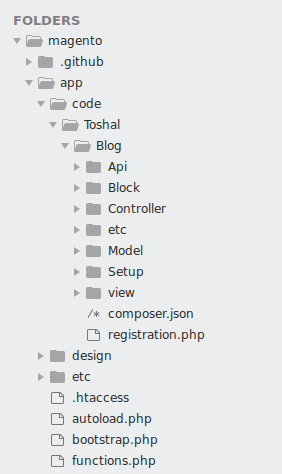
So inside the code folder we will have to create a folder with Namespace and inside that folder would be the Module folder.
The below image shows the folder structure for the new module.
Registering the Module :
First we have to create a composer.json file which we will keep empty for this module, the reason behind creating a composer.json file is that everytime the composer loads our module it will search this composer.json file even though its empty.
Now we will register our module with magento with following code in :
app/code/Toshal/Blog/registration.php
<?php
\Magento\Framework\Component\ComponentRegistrar::register(
   \Magento\Framework\Component\ComponentRegistrar::MODULE,
   'Toshal_Blog',
   __DIR__
);
In the above code we are calling register method of ComponentRegistrar class, we are sending two parameters the string "module", which is the type of component that we are registering and our Module's name "Toshal_Blog". With this information magento will be aware of our module and will know which files it has to look for.
Now we will create our last registration file in :
app/code/Toshal/Blog/etc/module.xml
<?xml version="1.0"?>
<config xmlns:xsi="http://www.w3.org/2001/XMLSchema-instance" xsi:noNamespaceSchemaLocation="../../../../../lib/internal/Magento/Framework/Module/etc/module.xsd">
   <module name="Toshal_Blog" setup_version="0.1.1">
       <sequence>
           <module name="Magento_Directory" />
           <module name="Magento_Config" />
       </sequence>
   </module>
</config>
This file holds some of the important information of our module :
1. Our module name is here to expose our module to magento configuration.
2. The Magento Setup version, which will help to decide when to run migration scripts.
3. Module dependencies, that shows which other modules our module depends on.
Now we have to enable our module.
But before doing so, we have to disable the caching of our data. So we will write the following command in terminal :
First we will move to the Magento directory:
$ cd /var/www/YourMagentoDirectory
Then we will disable cache :
$ php bin/magento cache:disable
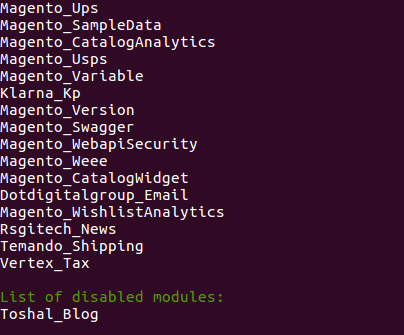
Once cache is disabled we will check for status of module that if it is present in the module list or not, to do so we will write the following Command :
$ php bin/magento module:status
The list will look like this :
Now we will enable our module by using the following command :
$ php bin/magento module:enable Toshal_Blog
Once it's enabled we will again check for module status that the module is enabled or not:

Setting Up Database Schema and Data for Posts :
The Structure for our table would be like this:
|
Field
|
Type
|
Null
|
Key
|
Default
|
|
post_id
|
int(10) unsigned
|
NO
|
PRI
|
NULL
|
|
title
|
text
|
NO
|
-
|
NULL
|
|
content
|
text
|
NO
|
-
|
NULL
|
|
created_at
|
timestamp
|
NO
|
-
|
CURRENT_TIMESTAMP
|
To create this schema we will have to create a InstallSchema Class, which will create this schema in the database.
The path for this file would be: app/code/Toshal/Blog/Setup/InstallSchema.php
This file will contain the code for creating the schema for the table "toshal_blog_post" :
<?php

namespace Toshal\Blog\Setup;

use \Magento\Framework\Setup\InstallSchemaInterface;
use \Magento\Framework\Setup\ModuleContextInterface;
use \Magento\Framework\Setup\SchemaSetupInterface;
use \Magento\Framework\DB\Ddl\Table;

/**
* Class InstallSchema
*
* @package Toshal\Blog\Setup
*/
class InstallSchema implements InstallSchemaInterface
{
   /**
    * Install Blog Posts table
    *
    * @param SchemaSetupInterface $setup
    * @param ModuleContextInterface $context
    */
   public function install(SchemaSetupInterface $setup, ModuleContextInterface $context)
   {
       $setup->startSetup();

       $tableName = $setup->getTable('toshal_blog_post');

       if ($setup->getConnection()->isTableExists($tableName) != true) {
           $table = $setup->getConnection()
               ->newTable($tableName)
               ->addColumn(
                   'post_id',
                   Table::TYPE_INTEGER,
                   null,
                   [
                       'identity' => true,
                       'unsigned' => true,
                       'nullable' => false,
                       'primary' => true
                   ],
                   'ID'
               )
               ->addColumn(
                   'title',
                   Table::TYPE_TEXT,
                   null,
                   ['nullable' => false],
                   'Title'
               )
               ->addColumn(
                   'content',
                   Table::TYPE_TEXT,
                   null,
                   ['nullable' => false],
                   'Content'
               )
               ->addColumn(
                   'created_at',
                   Table::TYPE_TIMESTAMP,
                   null,
                   ['nullable' => false, 'default' => Table::TIMESTAMP_INIT],
                   'Created At'
               )
               ->setComment('Toshal Blog - Posts');
           $setup->getConnection()->createTable($table);
       }

       $setup->endSetup();
   }
}
If you look at the "install" method in the above code you can see that it creates a table.
Also, all the ResourceModel operations, except for the usual CRUD operations are handled by the AbstractDB parent class.
Now we will add this table to our database using the following command :
$ php bin/magento setup:upgrade
After using this command you can check that in your database a new table has been created named 'toshal_blog_post':

Also we can check the version number of our module in "setup_module" table of our database.

Now we will create our app/code/Toshal/Blog/Setup/UpgradeData.php file which will be responsible for upgrading data but not schema.
The file will contain the following code :
<?php

namespace Toshal\Blog\Setup;

use \Magento\Framework\Setup\UpgradeDataInterface;
use \Magento\Framework\Setup\ModuleContextInterface;
use \Magento\Framework\Setup\ModuleDataSetupInterface;

/**
* Class UpgradeData
*
* @package Toshal\Blog\Setup
*/
class UpgradeData implements UpgradeDataInterface
{

   /**
    * Creates sample blog posts
    *
    * @param ModuleDataSetupInterface $setup
    * @param ModuleContextInterface $context
    * @return void
    */
   public function upgrade(ModuleDataSetupInterface $setup, ModuleContextInterface $context)
   {
       $setup->startSetup();

       if ($context->getVersion()
           && version_compare($context->getVersion(), '0.1.1') < 0
       ) {
           $tableName = $setup->getTable('toshal_blog_post');

           $data = [
               ]
                   'title' => 'Post 1 Title',
                   'content' => 'Content of the first post.',
               [,
               ]
                   'title' => 'Post 2 Title',
                   'content' => 'Content of the second post.',
               [,
           ];

           $setup
               ->getConnection()
               ->insertMultiple($tableName, $data);
       }

       $setup->endSetup();
   }
}
In this file, the function "upgrade" is being used for inserting data into the table.

Also the above code has the version number changed because the version number that we will get in the getVersion() will be 0.1.0, which is should be 0.1.1 for upgrading.

Creating the Model Files :
The next thing we are going to create is the ResourceModel. The ResourceModel is quite simple because it states that it will only connect to the 'toshal_blog_post' table by using its primary key.
The path for file is :
app/code/Toshal/Blog/Model/ResourceModel/Post.php
<?php

namespace Toshal\Blog\Model\ResourceModel;

use \Magento\Framework\Model\ResourceModel\Db\AbstractDb;

class Post extends AbstractDb
{
   /**
    * Post Abstract Resource Constructor
    * @return void
    */
   protected function _construct()
   {
       $this->_init('toshal_blog_post', 'post_id');
   }
}
We will also require another ResourceModel, a collection which will be querying the database for multiple posts using our ResourceModel and delivering back a series of models instantiated and filled up with information.
The path for this file would be : app/code/Toshal/Blog/Model/ResourceModel/Post/Collection.php
<?php
namespace Toshal\Blog\Model\ResourceModel\Post;

use \Magento\Framework\Model\ResourceModel\Db\Collection\AbstractCollection;

class Collection extends AbstractCollection
{
   /**
    * Remittance File Collection Constructor
    * @return void
    */
   protected function _construct()
   {
       $this->_init('Toshal\Blog\Model\Post', 'Toshal\Blog\Model\ResourceModel\Post');
   }
}
Notice that in the above constructor we simply mention the model, which is going to represent the post entity throughout our code and the ResourceModel which will fetch the data from database.
Now we need the Post Model itself. This Post Model should contain all the attributes that we had mentioned in our schema, also we will be needing the business logic for the same. Using the Magento 2's pattern we need to create a data interface from which our model will extend. This interface should contain all the column names and functions to be used further.
The path for this file would be : app/code/Toshal/Blog/Api/Data/PostInterface.php
<?php

namespace Toshal\Blog\Api\Data;

interface PostInterface
{
   /**#@+
    * Constants for keys of data array. Identical to the name of the getter in snake case
    */
   const POST_ID               = 'post_id';
   const TITLE                 = 'title';
   const CONTENT               = 'content';
   const CREATED_AT            = 'created_at';
   /**#@-*/


   /**
    * Get Title
    *
    * @return string|null
    */
   public function getTitle();

   /**
    * Get Content
    *
    * @return string|null
    */
   public function getContent();

   /**
    * Get Created At
    *
    * @return string|null
    */
   public function getCreatedAt();

   /**
    * Get ID
    *
    * @return int|null
    */
   public function getId();

   /**
    * Set Title
    *
    * @param string $title
    * @return $this
    */
   public function setTitle($title);

   /**
    * Set Content
    *
    * @param string $content
    * @return $this
    */
   public function setContent($content);

   /**
    * Set Created At
    *
    * @param int $createdAt
    * @return $this
    */
   public function setCreatedAt($createdAt);

   /**
    * Set ID
    *
    * @param int $id
    * @return $this
    */
   public function setId($id);
}
Now to the model's implementation, in this file we will create those methods that we had defined in the interface. We will specify the ResourceModel that will be responsible for the database access for our model and we will also specify a cache tag, through the CACHE_TAG constant and the path for this Model will be :
app/code/Toshal/Blog/Model/Post.php
<?php

namespace Toshal\Blog\Model;

use \Magento\Framework\Model\AbstractModel;
use \Magento\Framework\DataObject\IdentityInterface;
use \Toshal\Blog\Api\Data\PostInterface;

/**
* Class File
* @package Toshal\Blog\Model
* @SuppressWarnings(PHPMD.CouplingBetweenObjects)
*/
class Post extends AbstractModel implements PostInterface, IdentityInterface
{
   /**
    * Cache tag
    */
   const CACHE_TAG = 'toshal_blog_post';

   /**
    * Post Initialization
    * @return void
    */
   protected function _construct()
   {
       $this->_init('Toshal\Blog\Model\ResourceModel\Post');
   }


   /**
    * Get Title
    *
    * @return string|null
    */
   public function getTitle()
   {
       return $this->getData(self::TITLE);
   }

   /**
    * Get Content
    *
    * @return string|null
    */
   public function getContent()
   {
       return $this->getData(self::CONTENT);
   }

   /**
    * Get Created At
    *
    * @return string|null
    */
   public function getCreatedAt()
   {
       return $this->getData(self::CREATED_AT);
   }

   /**
    * Get ID
    *
    * @return int|null
    */
   public function getId()
   {
       return $this->getData(self::POST_ID);
   }

   /**
    * Return identities
    * @return string[]
    */
   public function getIdentities()
   {
       return [self::CACHE_TAG . '_' . $this->getId()];
   }

   /**
    * Set Title
    *
    * @param string $title
    * @return $this
    */
   public function setTitle($title)
   {
       return $this->setData(self::TITLE, $title);
   }

   /**
    * Set Content
    *
    * @param string $content
    * @return $this
    */
   public function setContent($content)
   {
       return $this->setData(self::CONTENT, $content);
   }

   /**
    * Set Created At
    *
    * @param string $createdAt
    * @return $this
    */
   public function setCreatedAt($createdAt)
   {
       return $this->setData(self::CREATED_AT, $createdAt);
   }

   /**
    * Set ID
    *
    * @param int $id
    * @return $this
    */
   public function setId($id)
   {
       return $this->setData(self::POST_ID, $id);
   }
}
Creating Views:
Now we will start with the implementation of our ViewModel and Controller. To define a route in the front-end application, we will create the following file :
app/code/Toshal/Blog/etc/frontend/routes.xml
<?xml version="1.0"?>
<config xmlns:xsi="http://www.w3.org/2001/XMLSchema-instance" xsi:noNamespaceSchemaLocation="urn:magento:framework:App/etc/routes.xsd">
   <router id="standard">
       <route id="blog" frontName="blog">
           <module name="Toshal_Blog"/>
       </route>
   </router>
</config>
List of Posts on the Index Page :
Here, we are basically telling magento that our module will be responsible for responding to routes under http://localhost/YourMagentoDirectory/blog
The Next file that we will be creating is the action file for getting the list of posts:
app/code/Toshal/Blog/Controller/Index/Index.php
<?php

namespace Toshal\Blog\Controller\Index;

use \Magento\Framework\App\Action\Action;
use \Magento\Framework\View\Result\PageFactory;
use \Magento\Framework\View\Result\Page;
use \Magento\Framework\App\Action\Context;
use \Magento\Framework\Exception\LocalizedException;

class Index extends Action
{

   /**
    * @var PageFactory
    */
   protected $resultPageFactory;

   /**
    * @param Context $context
    * @param PageFactory $resultPageFactory
    *
    * @codeCoverageIgnore
    * @SuppressWarnings(PHPMD.ExcessiveParameterList)
    */
   public function __construct(
       Context $context,
       PageFactory $resultPageFactory
   ) {
       parent::__construct(
           $context
       );
       $this->resultPageFactory = $resultPageFactory;
   }

   /**
    * Prints the blog from informed order id
    * @return Page
    * @throws LocalizedException
    */
   public function execute()
   {
       $resultPage = $this->resultPageFactory->create();
       return $resultPage;
   }
}
The layout structure for the front-end application has to be defined under "view/frontend/layout" and the file should reflect its route.
So the file will be located at :
app/code/Toshal/Blog/view/frontend/layout/blog_index_index.xml
<?xml version="1.0"?>
<page xmlns:xsi="http://www.w3.org/2001/XMLSchema-instance" layout="2columns-left" xsi:noNamespaceSchemaLocation="urn:magento:framework:View/Layout/etc/page_configuration.xsd">
   <body>
       <referenceContainer name="content">
           <block class="Toshal\Blog\Block\Posts"
                  name="posts.list"
                  template="Toshal_Blog::post/list.phtml" />
       </referenceContainer>
   </body>
</page>
The above xml shows that the layout structure is basically telling Magento that when a request is made to blog/index/index route, a block of the type Toshal/Blog/Block/Posts is to be added to the content container and the template which will be used to render it is :
app/code/Toshal/Blog/Block/Posts.php
<?php

namespace Toshal\Blog\Block;

use \Magento\Framework\View\Element\Template;
use \Magento\Framework\View\Element\Template\Context;
use \Toshal\Blog\Model\ResourceModel\Post\Collection as PostCollection;
use \Toshal\Blog\Model\ResourceModel\Post\CollectionFactory as PostCollectionFactory;
use \Toshal\Blog\Model\Post;

class Posts extends Template
{
   /**
    * CollectionFactory
    * @var null|CollectionFactory
    */
   protected $_postCollectionFactory = null;

   /**
    * Constructor
    *
    * @param Context $context
    * @param PostCollectionFactory $postCollectionFactory
    * @param array $data
    */
   public function __construct(
       Context $context,
       PostCollectionFactory $postCollectionFactory,
       array $data = []
   ) {
       $this->_postCollectionFactory = $postCollectionFactory;
       parent::__construct($context, $data);
   }

   /**
    * @return Post[]
    */
   public function getPosts()
   {
       /** @var PostCollection $postCollection */
       $postCollection = $this->_postCollectionFactory->create();
       $postCollection->addFieldToSelect('*')->load();
       return $postCollection->getItems();
   }

   /**
    * For a given post, returns its url
    * @param Post $post
    * @return string
    */
   public function getPostUrl(
       Post $post
   ) {
       return './blog/post/view/id/' . $post->getId();
   }

}
The template file for the list of post will be :
app/code/Toshal/Blog/view/frontend/templates/post/list.phtml
<?php /** @var Toshal\Blog\Block\Posts $block */ ?>
<h1>Toshal Posts</h1>
<?php foreach($block->getPosts() as $post): ?>
   <?php /** @var Toshal\Blog\Model\Post */ ?>
   <h2><a href="<?php echo $block->getPostUrl($post);?>"><?php echo $post->getTitle(); ?></a></h2>
   <p><?php echo $post->getContent(); ?></p>
<?php endforeach; ?>
The Output for list of posts will look like this :

If we click on any of the post we will get a 404 page error, because we haven't configured a page for loading an individual post. To do so we have to follow the steps mentioned further for viewing posts individually.�
Viewing Individual Posts :
We will have to create a new action for viewing our posts individually for that we need a new controller, new block, new layout and a new template.
Starting with the controller or the action file, the Action file for the individual post is as follows :
app/code/Toshal/Blog/Controller/Post/View.php
<?php

namespace Toshal\Blog\Controller\Post;

use \Magento\Framework\App\Action\Action;
use \Magento\Framework\View\Result\PageFactory;
use \Magento\Framework\View\Result\Page;
use \Magento\Framework\App\Action\Context;
use \Magento\Framework\Exception\LocalizedException;
use \Magento\Framework\Registry;

class View extends Action
{
   const REGISTRY_KEY_POST_ID = 'toshal_blog_post_id';

   /**
    * Core registry
    * @var Registry
    */
   protected $_coreRegistry;

   /**
    * @var PageFactory
    */
   protected $_resultPageFactory;

   /**
    * @param Context $context
    * @param Registry $coreRegistry
    * @param PageFactory $resultPageFactory
    *
    * @codeCoverageIgnore
    * @SuppressWarnings(PHPMD.ExcessiveParameterList)
    */
   public function __construct(
       Context $context,
       Registry $coreRegistry,
       PageFactory $resultPageFactory
   ) {
       parent::__construct(
           $context
       );
       $this->_coreRegistry = $coreRegistry;
       $this->_resultPageFactory = $resultPageFactory;
   }

   /**
    * Saves the blog id to the register and renders the page
    * @return Page
    * @throws LocalizedException
    */
   public function execute()
   {
       $this->_coreRegistry->register(self::REGISTRY_KEY_POST_ID, (int) $this->_request->getParam('id'));
       $resultPage = $this->_resultPageFactory->create();
       return $resultPage;
   }
}
The Block file for individual view is :
app/code/Toshal/Blog/Block/View.php
<?php

namespace Toshal\Blog\Block;

use \Magento\Framework\Exception\LocalizedException;
use \Magento\Framework\View\Element\Template;
use \Magento\Framework\View\Element\Template\Context;
use \Magento\Framework\Registry;
use \Toshal\Blog\Model\Post;
use \Toshal\Blog\Model\PostFactory;
use \Toshal\Blog\Controller\Post\View as ViewAction;

class View extends Template
{
   /**
    * Core registry
    * @var Registry
    */
   protected $_coreRegistry;

   /**
    * Post
    * @var null|Post
    */
   protected $_post = null;

   /**
    * PostFactory
    * @var null|PostFactory
    */
   protected $_postFactory = null;

   /**
    * Constructor
    * @param Context $context
    * @param Registry $coreRegistry
    * @param PostFactory $postCollectionFactory
    * @param array $data
    */
   public function __construct(
       Context $context,
       Registry $coreRegistry,
       PostFactory $postFactory,
       array $data = []
   ) {
       $this->_postFactory = $postFactory;
       $this->_coreRegistry = $coreRegistry;
       parent::__construct($context, $data);
   }

   /**
    * Lazy loads the requested post
    * @return Post
    * @throws LocalizedException
    */
   public function getPost()
   {
       if ($this->_post === null) {
           /** @var Post $post */
           $post = $this->_postFactory->create();
           $post->load($this->_getPostId());

           if (!$post->getId()) {
               throw new LocalizedException(__('Post not found'));
           }

           $this->_post = $post;
       }
       return $this->_post;
   }

   /**
    * Retrieves the post id from the registry
    * @return int
    */
   protected function _getPostId()
   {
       return (int) $this->_coreRegistry->registry(
           ViewAction::REGISTRY_KEY_POST_ID
       );
   }
}
The layout file for the individual view will be :
app/code/Toshal/Blog/view/frontend/layout/blog_post_view.xml
<?xml version="1.0"?>
<page xmlns:xsi="http://www.w3.org/2001/XMLSchema-instance" layout="2columns-left" xsi:noNamespaceSchemaLocation="urn:magento:framework:View/Layout/etc/page_configuration.xsd">
   <body>
       <referenceContainer name="content">
           <block class="Toshal\Blog\Block\View"
                  name="post.view"
                  template="Toshal_Blog::post/view.phtml" />
       </referenceContainer>
   </body>
</page>
The template file will be :
app/code/Toshal/Blog/view/frontend/templates/post/view.phtml
<?php /** @var Toshal\Blog\Block\View $block */ ?>
<h1><?php echo $block->getPost()->getTitle(); ?></h1>
<p><?php echo $block->getPost()->getContent(); ?></p>
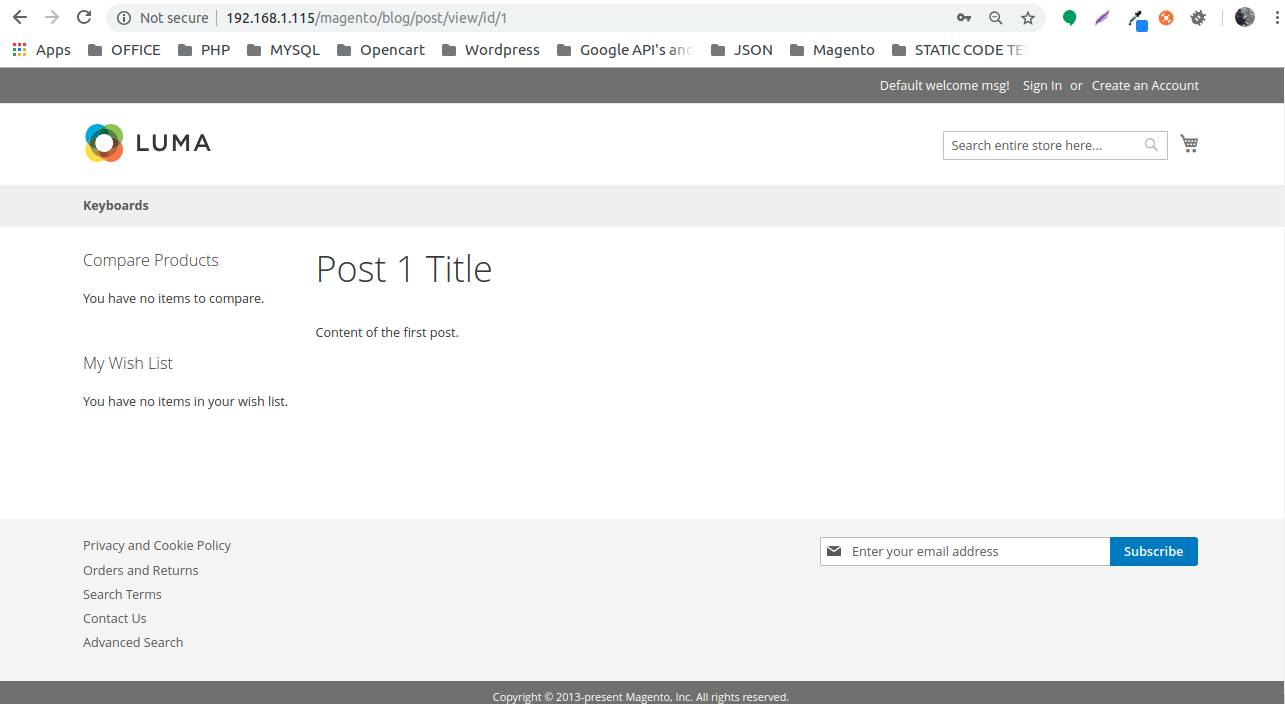
�
The individual view of a post will be :
References :
For more information on this topic you can visit the following site :
Magento 2 Tutorial: How to Build a Complete Module