In the initial stages of Android development, learners do write codes in such a manner that eventually creates a MainActivity class that contains all the implementation logic(real-world business logic) of the application. This approach to app development leads to Android activity getting closely coupled to both UI and the application data processing mechanism. Further, it causes difficulties in the maintenance and scaling of such mobile applications.
To avoid such problems in maintainability, readability, scalability, and refactoring of applications, developers prefer to define well-separated layers of code. By applying software architecture patterns, one can organize the code of the application to separate the concerns. MVP (Model — View — Presenter) architecture is one of the most popular architecture patterns and is valid in organizing the project.
MVP (Model — View — Presenter) comes into the picture as an alternative to the traditional MVC (Model — View — Controller) architecture pattern. Using MVC as the software architecture, developers end up with the following difficulties:
- Most of the core business logic resides in Controller. During the lifetime of an application, this file grows bigger and it becomes difficult to maintain the code.
- Because of tightly-coupled UI and data access mechanisms, both Controller and View layer falls in the same activity or fragment. This cause problem in making changes in the features of the application.
- It becomes hard to carry out Unit testing of the different layer as most of the part which are under testing needs Android SDK components.
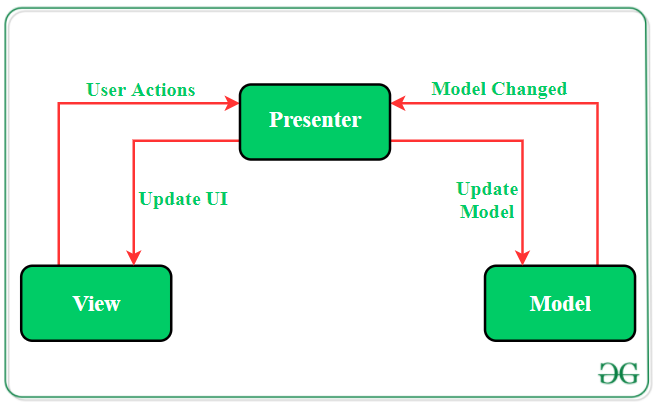
MVP pattern overcomes these challenges of MVC and provides an easy way to structure the project codes. The reason why MVP is widely accepted is that it provides modularity, testability, and a more clean and maintainable codebase. It is composed of the following three components:
- Model: Layer for storing data. It is responsible for handling the domain logic(real-world business rules) and communication with the database and network layers.
- View: UI(User Interface) layer. It provides the visualization of the data and keep a track of the user’s action in order to notify the Presenter.
- Presenter: Fetch the data from the model and applies the UI logic to decide what to display. It manages the state of the View and takes actions according to the user’s input notification from the View.
Key Points of MVP Architecture
- Communication between View-Presenter and Presenter-Model happens via an interface(also called Contract).
- One Presenter class manages one View at a time i.e., there is a one-to-one relationship between Presenter and View.
- Model and View class don’t have knowledge about each other’s existence.
Advantages of MVP Architecture
- No conceptual relationship in android components
- Easy code maintenance and testing as the application’s model, view, and presenter layer are separated.
Disadvantages of MVP Architecture
- If the developer does not follow the single responsibility principle to break the code then the Presenter layer tends to expand to a huge all-knowing class.
Example of MVP Architecture
To show the implementation of the MVP architecture pattern on projects, here is an example of a single activity android application. The application will display some strings on the View(Activity) by doing a random selection from the Model. The role of the Presenter class is to keep the business logic of the application away from the activity. Below is the complete step-by-step implementation of this android application. Note that we are going to implement the project using both Java and Kotlin language.
Step 1: Create a new project
- Click on File, then New => New Project.
- Choose Empty activity
- Select language as Java/Kotlin
- Select the minimum SDK as per your need.
Step 2: Modify String.xml file
All the strings which are used in the activity are listed in this file.
<resources>
<string name="app_name">MVP Architecture</string>
<string name="buttonText">Display Next Course</string>
<string name="heading">MVP Architecture Pattern</string>
<string name="subHeading">Toshal's Computer Science Online Courses</string>
<string name="description">Course Description</string>
</resources>
Step 3: Working with the activity_main.xml file
Open the activity_main.xml file and add a Button, a TextView to display the string, and a Progress Bar to give a dynamic feel to the application. Below is the code for designing a proper activity layout.
<?xml version="1.0" encoding="utf-8"?>
<androidx.constraintlayout.widget.ConstraintLayout
xmlns:android="http://schemas.android.com/apk/res/android"
xmlns:app="http://schemas.android.com/apk/res-auto"
xmlns:tools="http://schemas.android.com/tools"
android:layout_width="match_parent"
android:layout_height="match_parent"
android:background="#168BC34A"
tools:context=".MainActivity">
<!-- TextView to display heading of the activity -->
<TextView
android:id="@+id/textView3"
android:layout_width="wrap_content"
android:layout_height="wrap_content"
android:fontFamily="@font/roboto"
android:text="@string/heading"
android:textAlignment="center"
android:textColor="@android:color/holo_green_dark"
android:textSize="30sp"
android:textStyle="bold"
app:layout_constraintBottom_toBottomOf="parent"
app:layout_constraintEnd_toEndOf="parent"
app:layout_constraintHorizontal_bias="0.498"
app:layout_constraintStart_toStartOf="parent"
app:layout_constraintTop_toTopOf="parent"
app:layout_constraintVertical_bias="0.060000002" />
<!-- TextView to display sub heading of the activity -->
<TextView
android:id="@+id/textView2"
android:layout_width="wrap_content"
android:layout_height="wrap_content"
android:fontFamily="@font/roboto"
android:text="@string/subHeading"
android:textAlignment="center"
android:textColor="@android:color/holo_green_dark"
android:textSize="24sp"
android:textStyle="bold"
app:layout_constraintBottom_toTopOf="@+id/button"
app:layout_constraintEnd_toEndOf="parent"
app:layout_constraintHorizontal_bias="1.0"
app:layout_constraintStart_toStartOf="parent"
app:layout_constraintTop_toTopOf="parent"
app:layout_constraintVertical_bias="0.356" />
<!-- TextView to display the random string -->
<TextView
android:id="@+id/textView"
android:layout_width="411dp"
android:layout_height="wrap_content"
android:fontFamily="@font/roboto"
android:gravity="center"
android:padding="8dp"
android:text="@string/description"
android:textAlignment="center"
android:textAppearance="?android:attr/textAppearanceSearchResultTitle"
app:layout_constraintBottom_toTopOf="@+id/button"
app:layout_constraintEnd_toEndOf="parent"
app:layout_constraintStart_toStartOf="parent"
app:layout_constraintTop_toBottomOf="@+id/textView2"
app:layout_constraintVertical_bias="0.508" />
<!-- Button to display next random string -->
<Button
android:id="@+id/button"
android:layout_width="0dp"
android:layout_height="wrap_content"
android:layout_margin="@android:dimen/notification_large_icon_height"
android:background="#4CAF50"
android:text="@string/buttonText"
android:textAllCaps="true"
android:textColor="@android:color/background_light"
android:textSize="20sp"
android:textStyle="bold"
app:layout_constraintBottom_toBottomOf="parent"
app:layout_constraintLeft_toLeftOf="parent"
app:layout_constraintRight_toRightOf="parent"
app:layout_constraintTop_toTopOf="parent"
app:layout_constraintVertical_bias="0.79" />
<!-- Progress Bar to be displayed before displaying next string -->
<ProgressBar
android:id="@+id/progressBar"
style="?android:attr/progressBarStyleLarge"
android:layout_width="wrap_content"
android:layout_height="wrap_content"
android:visibility="gone"
app:layout_constraintBottom_toBottomOf="parent"
app:layout_constraintLeft_toLeftOf="parent"
app:layout_constraintRight_toRightOf="parent"
app:layout_constraintTop_toTopOf="parent" />
<ImageView
android:id="@+id/imageView"
android:layout_width="wrap_content"
android:layout_height="wrap_content"
app:layout_constraintBottom_toBottomOf="parent"
app:layout_constraintEnd_toEndOf="parent"
app:layout_constraintStart_toStartOf="parent"
app:layout_constraintTop_toBottomOf="@+id/button"
app:layout_constraintVertical_bias="1.0"
app:srcCompat="@drawable/banner" />
</androidx.constraintlayout.widget.ConstraintLayout>
Step 4: Defining the Contract Interface file for the Model, View, and Presenter
To establish communication between View-Presenter and Presenter-Model, an interface is needed. This interface class will contain all abstract methods which will be defined later in the View, Model, and Presenter class.
public interface Contract {
interface View {
// method to display progress bar
// when next random course details
// is being fetched
void showProgress();
// method to hide progress bar
// when next random course details
// is being fetched
void hideProgress();
// method to set random
// text on the TextView
void setString(String string);
}
interface Model {
// nested interface to be
interface OnFinishedListener {
// function to be called
// once the Handler of Model class
// completes its execution
void onFinished(String string);
}
void getNextCourse(Contract.Model.OnFinishedListener onFinishedListener);
}
interface Presenter {
// method to be called when
// the button is clicked
void onButtonClick();
// method to destroy
// lifecycle of MainActivity
void onDestroy();
}
}
Step 5: Creating the Model class
Create a new class named Model to separate all string data and the methods to fetch those data. This class will not know the existence of View Class.
import android.os.Handler;
import java.util.Arrays;
import java.util.List;
import java.util.Random;
public class Model implements Contract.Model {
// array list of strings from which
// random strings will be selected
// to display in the activity
private List<String> arrayList = Arrays.asList(
"DSA Self Paced: Master the basics of Data Structures and Algorithms to solve complex problems efficiently. ",
"Placement 100: This course will guide you for placement with theory,lecture videos, weekly assignments " +
"contests and doubt assistance.",
"Amazon SDE Test Series: Test your skill & give the final touch to your preparation before applying for " +
"product based against like Amazon, Microsoft, etc.",
"Complete Interview Preparation: Cover all the important concepts and topics required for the interviews. " +
"Get placement ready before the interviews begin",
"Low Level Design for SDE 1 Interview: Learn Object-oriented Analysis and Design to prepare for " +
"SDE 1 Interviews in top companies"
);
@Override
// this method will invoke when
// user clicks on the button
// and it will take a delay of
// 1200 milliseconds to display next course detail
public void getNextCourse(final OnFinishedListener listener) {
new Handler().postDelayed(new Runnable() {
@Override
public void run() {
listener.onFinished(getRandomString());
}
}, 1200);
}
// method to select random
// string from the list of strings
private String getRandomString() {
Random random = new Random();
int index = random.nextInt(arrayList.size());
return arrayList.get(index);
}
}
Step 6: Creating the Presenter class
The methods of this class contain core business logic which will decide what to display and how to display. It triggers the View class to make the necessary changes to the UI.
public class Presenter implements Contract.Presenter, Contract.Model.OnFinishedListener {
// creating object of View Interface
private Contract.View mainView;
// creating object of Model Interface
private Contract.Model model;
// instantiating the objects of View and Model Interface
public Presenter(Contract.View mainView, Contract.Model model) {
this.mainView = mainView;
this.model = model;
}
@Override
// operations to be performed
// on button click
public void onButtonClick() {
if (mainView != null) {
mainView.showProgress();
}
model.getNextCourse(this);
}
@Override
public void onDestroy() {
mainView = null;
}
@Override
// method to return the string
// which will be displayed in the
// Course Detail TextView
public void onFinished(String string) {
if (mainView != null) {
mainView.setString(string);
mainView.hideProgress();
}
}
}
Step 7: Define functionalities of View in the MainActivity file
The View class is responsible for updating the UI according to the changes triggered by the Presenter layer. The data provided by the Model will be used by View and the appropriate changes will be made in the activity.
import androidx.appcompat.app.AppCompatActivity;
import android.os.Bundle;
import android.view.View;
import android.widget.Button;
import android.widget.ProgressBar;
import android.widget.TextView;
import static android.view.View.GONE;
public class MainActivity extends AppCompatActivity implements Contract.View {
// creating object of TextView class
private TextView textView;
// creating object of Button class
private Button button;
// creating object of ProgressBar class
private ProgressBar progressBar;
// creating object of Presenter interface in Contract
Contract.Presenter presenter;
@Override
protected void onCreate(Bundle savedInstanceState) {
super.onCreate(savedInstanceState);
setContentView(R.layout.activity_main);
// assigning ID of the TextView
textView = findViewById(R.id.textView);
// assigning ID of the Button
button = findViewById(R.id.button);
// assigning ID of the ProgressBar
progressBar = findViewById(R.id.progressBar);
// instantiating object of Presenter Interface
presenter = new Presenter(this, new Model());
// operations to be performed when
// user clicks the button
button.setOnClickListener(new View.OnClickListener() {
@Override
public void onClick(View v) {
presenter.onButtonClick();
}
});
}
@Override
protected void onResume() {
super.onResume();
}
@Override
protected void onDestroy() {
super.onDestroy();
presenter.onDestroy();
}
@Override
// method to display the Course Detail TextView
public void showProgress() {
progressBar.setVisibility(View.VISIBLE);
textView.setVisibility(View.INVISIBLE);
}
@Override
// method to hide the Course Detail TextView
public void hideProgress() {
progressBar.setVisibility(GONE);
textView.setVisibility(View.VISIBLE);
}
@Override
// method to set random string
// in the Course Detail TextView
public void setString(String string) {
textView.setText(string);
}
}