Developers always prefer clean and structured code for their projects. By organizing the codes according to a design pattern helps in the maintenance of the software. By having knowledge of all crucial logic parts of the android application, it is easier to add and remove app features. Further, design patterns also assure that all the codes get covered in Unit Testing without the interference of other classes.
Model — View — ViewModel (MVVM) is the industry-recognized software architecture pattern that overcomes all drawbacks of MVP and MVC design patterns. MVVM suggests separating the data presentation logic(Views or UI) from the core business logic part of the application.
Advantages of MVVM Architecture
- Enhance the reusability of code.
- All modules are independent which improves the testability of each layer.
- Makes project files maintainable and easy to make changes.
Disadvantages of MVVM Architecture
- This design pattern is not ideal for small projects.
- If the data binding logic is too complex, the application debugging will be a little harder.
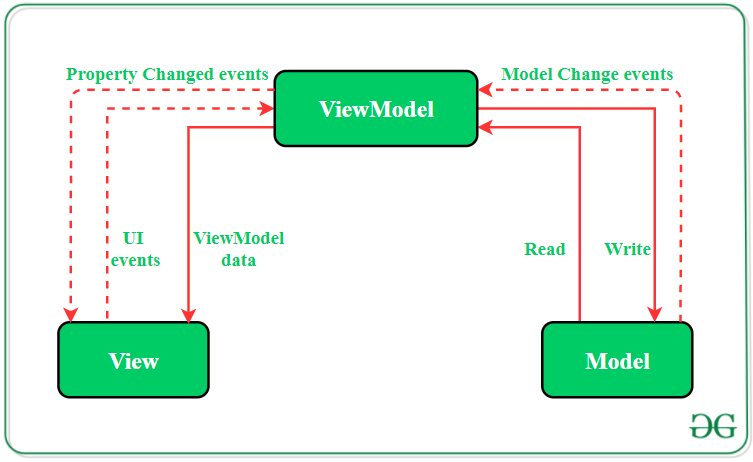
The separate code layers of MVVM are:
- Model: This layer is responsible for the abstraction of the data sources. Model and ViewModel work together to get and save the data.
- View: The purpose of this layer is to inform the ViewModel about the user’s action. This layer observes the ViewModel and does not contain any kind of application logic.
- ViewModel: It exposes those data streams which are relevant to the View. Moreover, it serves as a link between the Model and the View.
MVVM pattern has some similarities with the MVP(Model — View — Presenter) design pattern as the Presenter role is played by ViewModel. However, the drawbacks of the MVP pattern has been solved by MVVM in the following ways:
- ViewModel does not hold any kind of reference to the View.
- Many to 1 relationship exist between View and ViewModel.
- No triggering methods to update the View.
Ways to Implement MVVM in the Project
There are 2 ways to implement MVVM design pattern in Android projects:
- Using the DataBinding library released by Google
- Using any tool like RxJava for DataBinding.
Data Binding:
Google releases the Data Binding Library for Android that allows the developers to bind UI components in the XML layouts with the application’s data repositories. This helps in minimizing the code of core application logic that binds with View. Further, Two – way Data Binding is done for binding the objects to the XML layouts so that object and the layout both can send data to each other.
Example of MVVM Architecture Pattern
Here is an example of a single activity User-Login android application to show the implementation of the MVVM architecture pattern on projects. The application will ask the user to input the Email ID and password. Based on the inputs received the ViewModel notifies the View what to show as a toast message. The ViewModel will not have a reference to the View.
To enable DataBinding in the android application, following codes needs to be added in the app’s build.gradle(build.gradle (:app)) file:
Enable DataBinding:
android {
dataBinding {
enabled = true
}
}
Add lifecycle dependency:
implementation ‘android.arch.lifecycle:extensions:1.1.1’
Step by Step Implementation
tep 1: Create a new project
- Click on File, then New => New Project.
- Choose Empty activity
- Select language as Java/Kotlin
- Select the minimum SDK as per your need.
Step 2: Modify String.xml file
All the strings which are used in the activity are listed in this file.
<resources>
<string name="app_name">GfG | MVVM Architecture</string>
<string name="heading">MVVM Architecture Pattern</string>
<string name="email_hint">Enter your Email ID</string>
<string name="password_hint">Enter your password</string>
<string name="button_text">Login</string>
</resources>
Step 3: Creating the Model class
Create a new class named Model to which will hold the Email ID and password entered by the user. Below is the code to implement the proper Model class.
import androidx.annotation.Nullable;
public class Model {
@Nullable
String email,password;
// constructor to initialize
// the variables
public Model(String email, String password){
this.email = email;
this.password = password;
}
// getter and setter methods
// for email variable
@Nullable
public String getEmail() {
return email;
}
public void setEmail(@Nullable String email) {
this.email = email;
}
// getter and setter methods
// for password variable
@Nullable
public String getPassword() {
return password;
}
public void setPassword(@Nullable String password) {
this.password = password;
}
}
Step 4: Working with the activity_main.xml file
Open the activity_main.xml file and add 2 EditText to get inputs for Email and Password. One Login Button is also required to validate the user’s input and display appropriate Toast message. Below is the code for designing a proper activity layout.
<?xml version="1.0" encoding="utf-8"?>
<layout xmlns:android="http://schemas.android.com/apk/res/android"
xmlns:app="http://schemas.android.com/apk/res-auto"
xmlns:bind="http://schemas.android.com/tools">
<!-- binding object of ViewModel to the XML layout -->
<data>
<variable
name="viewModel"
type="com.example.mvvmarchitecture.AppViewModel" />
</data>
<!-- Provided Linear layout for the activity components -->
<LinearLayout
android:layout_width="match_parent"
android:layout_height="match_parent"
android:layout_gravity="center"
android:layout_margin="8dp"
android:background="#168BC34A"
android:orientation="vertical">
<!-- TextView for the heading of the activity -->
<TextView
android:id="@+id/textView"
android:layout_width="match_parent"
android:layout_height="wrap_content"
android:text="@string/heading"
android:textAlignment="center"
android:textColor="@android:color/holo_green_dark"
android:textSize="36sp"
android:textStyle="bold" />
<!-- EditText field for the Email -->
<EditText
android:id="@+id/inEmail"
android:layout_width="match_parent"
android:layout_height="wrap_content"
android:layout_marginStart="10dp"
android:layout_marginTop="60dp"
android:layout_marginEnd="10dp"
android:layout_marginBottom="20dp"
android:hint="@string/email_hint"
android:inputType="textEmailAddress"
android:padding="8dp"
android:text="@={viewModel.userEmail}" />
<!-- EditText field for the password -->
<EditText
android:id="@+id/inPassword"
android:layout_width="match_parent"
android:layout_height="wrap_content"
android:layout_marginStart="10dp"
android:layout_marginEnd="10dp"
android:hint="@string/password_hint"
android:inputType="textPassword"
android:padding="8dp"
android:text="@={viewModel.userPassword}" />
<!-- Login Button of the activity -->
<Button
android:layout_width="match_parent"
android:layout_height="wrap_content"
android:layout_marginStart="20dp"
android:layout_marginTop="60dp"
android:layout_marginEnd="20dp"
android:background="#4CAF50"
android:fontFamily="@font/roboto"
android:onClick="@{()-> viewModel.onButtonClicked()}"
android:text="@string/button_text"
android:textColor="@android:color/background_light"
android:textSize="30sp"
android:textStyle="bold"
bind:toastMessage="@{viewModel.toastMessage}" />
<ImageView
android:id="@+id/imageView"
android:layout_width="match_parent"
android:layout_height="wrap_content"
android:layout_marginTop="135dp"
app:srcCompat="@drawable/banner" />
</LinearLayout>
</layout>
Step 5: Creating the ViewModel class
This class will contain all the methods which are needed to be called in the application layout. The ViewModel class will extend BaseObservable because it converts the data into streams and notifies the View when the toast message property will change.
import android.text.TextUtils;
import android.util.Patterns;
import androidx.databinding.BaseObservable;
import androidx.databinding.Bindable;
public class AppViewModel extends BaseObservable {
// creating object of Model class
private Model model;
// string variables for
// toast messages
private String successMessage = "Login successful";
private String errorMessage = "Email or Password is not valid";
@Bindable
// string variable for
// toast message
private String toastMessage = null;
// getter and setter methods
// for toast message
public String getToastMessage() {
return toastMessage;
}
private void setToastMessage(String toastMessage) {
this.toastMessage = toastMessage;
notifyPropertyChanged(BR.toastMessage);
}
// getter and setter methods
// for email variable
@Bindable
public String getUserEmail() {
return model.getEmail();
}
public void setUserEmail(String email) {
model.setEmail(email);
notifyPropertyChanged(BR.userEmail);
}
// getter and setter methods
// for password variable
@Bindable
public String getUserPassword() {
return model.getPassword();
}
public void setUserPassword(String password) {
model.setPassword(password);
notifyPropertyChanged(BR.userPassword);
}
// constructor of ViewModel class
public AppViewModel() {
// instantiating object of
// model class
model = new Model("","");
}
// actions to be performed
// when user clicks
// the LOGIN button
public void onButtonClicked() {
if (isValid())
setToastMessage(successMessage);
else
setToastMessage(errorMessage);
}
// method to keep a check
// that variable fields must
// not be kept empty by user
public boolean isValid() {
return !TextUtils.isEmpty(getUserEmail()) && Patterns.EMAIL_ADDRESS.matcher(getUserEmail()).matches()
&& getUserPassword().length() > 5;
}
}
Step 6: Define functionalities of View in the MainActivity file
The View class is responsible for updating the UI of the application. According to the changes in the toast message provided by ViewModel, the Binding Adapter would trigger the View layer. The setter of Toast message will notify the observer(View) about the changes in data. After that, View will take appropriate actions.
import android.os.Bundle;
import android.view.View;
import android.widget.Toast;
import androidx.appcompat.app.AppCompatActivity;
import androidx.databinding.BindingAdapter;
import androidx.databinding.DataBindingUtil;
import com.example.mvvmarchitecture.databinding.ActivityMainBinding;
public class MainActivity extends AppCompatActivity {
@Override
protected void onCreate(Bundle savedInstanceState) {
super.onCreate(savedInstanceState);
// ViewModel updates the Model
// after observing changes in the View
// model will also update the view
// via the ViewModel
ActivityMainBinding activityMainBinding = DataBindingUtil.setContentView(this, R.layout.activity_main);
activityMainBinding.setViewModel(new AppViewModel());
activityMainBinding.executePendingBindings();
}
// any change in toastMessage attribute
// defined on the Button with bind prefix
// invokes this method
@BindingAdapter({"toastMessage"})
public static void runMe( View view, String message) {
if (message != null)
Toast.makeText(view.getContext(), message, Toast.LENGTH_SHORT).show();
}
}